How To Create Nested Grid Using Angular 8
Introduction : In this article we will learn how we create nested grid in angular 8.
How it will work ?
Here we are using the grid list to separate my page into small sections and in each section and we want to place a different component and one of these components is another smaller grid.
Prerequisite
Basic knowledge of Angular
Visual Studio Code must be installed
Angular CLI must be installed
Node JS must be installed
FRONT END
Step 1:Lets create a angular project using following npm command
- ng new nestedGrid
Step 2: Open the newly created project in visual studio code and install bootstrap in this project
- npm install bootstrap --save
Now open styles.css file and add Bootstrap file reference.To add reference in styles.css file add this line.
- @import '~bootstrap/dist/css/bootstrap.min.css';
Step 3 Now lets create a new component by using following command.
- ng g c product
Step 4 Now create a new service using the following command .
- ng generate service product
Step 5 Now open the 'product.component.html' and paste the following code to see the html template.
- <div class="card">
- <div class="card-body pb-0">
- <h4 style="text-align: center;">Example of Angular Nested Grid</h4>
- <div class="row">
- <div class="col-12 col-md-12">
- <div class="card">
- <div class="card-body position-relative">
- <div class="table-responsive cnstr-record product-tbl">
- <table class="table table-bordered heading-hvr">
- <thead>
- <tr>
- <th> </th>
- <th width="50">Art.No
- </th>
- <th>Brand</th>
- <th>
- Price/Unit</th>
- <th>Provider</th>
- <th>P. Art. N</th>
- <th>S. A/C</th>
- <th>Buy A/C</th>
- </tr>
- </thead>
- <tbody *ngFor="let product of products; let i = index">
- <tr>
- <td align="center">
- <a class="expand-row" *ngIf="!hideme[i]" (click)="showProductCountryInfo(i,product.ProductId)">
- <img src="../../assets/Images/plus.png" />
- </a>
- <a class="expand-row" *ngIf="hideme[i]" (click)="hideme[i] = !hideme[i]">
- <img src="../../assets/Images/minus.png" />
- </a>
- </td>
- <td align="center">{{product.ArtNo}}</td>
- <td>{{product.Brand}}</td>
- <td>{{product.Price }}</td>
- <td>{{product.Provider}}</td>
- <td>{{product.ProviderArtNo}}</td>
- <td>{{product.SalesAccount}}</td>
- <td>{{product.BuyAccount}}</td>
- </tr>
- <!-- <div id="myresult" class="img-zoom-result"></div> -->
- <tr [hidden]="!hideme[i]" class="sub-table no-bg">
- <td align="center"> </td>
- <td colspan="15" class="p-0">
- <table class="table mb-0 table-striped">
- <thead class="bg-dark text-white">
- <tr>
- <th>CountryName</th>
- <th>Price/Unit</th>
- <th>Sales Account</th>
- <th>Buy Account</th>
- </tr>
- </thead>
- <tbody>
- <tr *ngFor="let productCountryInfo of productCountryInformation[i]">
- <td>{{productCountryInfo.CountryName}}</td>
- <td>{{productCountryInfo.Price}}</td>
- <td>{{productCountryInfo.SalesAccount}}</td>
- <td>{{productCountryInfo.BuyAccount}}</td>
- </tr>
- </tbody>
- </table>
- </td>
- </tr>
- </tbody>
- </table>
- </div>
- </div>
- </div>
- </div>
- </div>
- </div>
- </div>
Step 6 After then open 'product.component.ts' file and add the following code in this file where our logic has written.
- import { Component, OnInit } from '@angular/core';
- import { ProductsService } from './products.service';
- @Component({
- selector: 'app-products',
- templateUrl: './products.component.html',
- styleUrls: ['./products.component.css']
- })
- export class ProductsComponent implements OnInit {
- products = [];
- countryCode: any;
- currencySymbol:any;
- productCountryInformation: any = [];
- hideme = [];
- Index: any;
- countryId: any;
- country: any;
- priceToDisplay=[];
- constructor(private _productService: ProductsService) {
- }
- ngOnInit() {
- this.countryId=0;
- this.getProducts(this.countryId);
- }
- public getProducts(countryId) {
- let data = [];
- this._productService.getAllProducts(countryId).subscribe((data: any) => {
- this.products =data;
- })
- }
- public showProductCountryInfo(index,productId) {
- this._productService.countryInfo(productId).subscribe((res:any)=>{
- this.productCountryInformation[index] = res;
- })
- this.hideme[index] = !this.hideme[index];
- this.Index = index;
- }
- }
Step 7 Next open 'product.component.css' file and paste the code for some styling.
Step 8 At last open 'product.service.ts' file and add services to call our api.
- import { Injectable } from '@angular/core';
- import { HttpClient } from '@angular/common/http';
- @Injectable()
- export class ProductsService {
- private url = "";
- constructor(public http: HttpClient) {
- }
- getAllProducts(countryCode) {
- this.url = 'http://localhost:49661/api/Company/getAllProducts?countryCode='+countryCode;
- return this.http.get<any[]>(this.url);
- }
- countryInfo(productId) {
- this.url = 'http://localhost:49661/api/Company/getProductCountryInformation?productId='+productId;
- return this.http.get<any[]>(this.url);
- }
- }
Step 9:Its time to see the output in your terminal type 'ng serve -o' to compile and open it in browser.
After loading our page you can see the output like below images
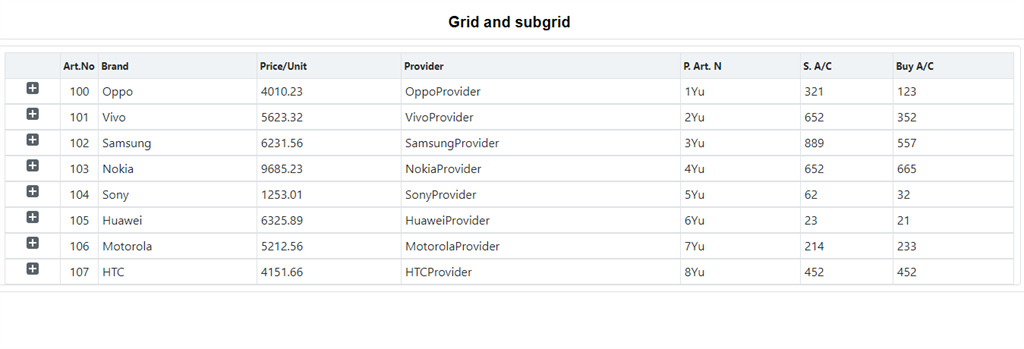
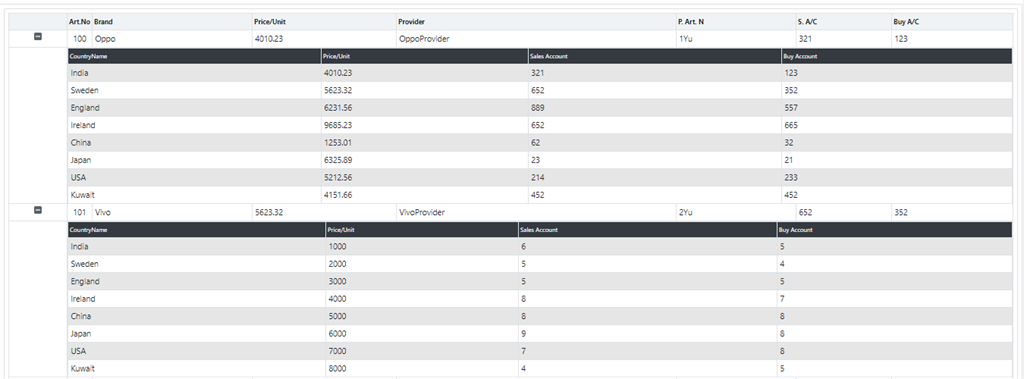
Here i am taking product for example,grid data is related to product and their corresponding nested grid having information related to their parent grid.
You can check nested grid by clicking the plus icon of parent grid so that you can see the resultant nested grid based on the index i.e if you click on very 1st plus icon then you can only see its first product related information, if you click on second plus icon then their product related information would show.
Now Front end part is done and its time to add server side code and back end code.
WEB API
Create an ASP.NET Core application
Follow these steps to create an ASP.NET Core application.
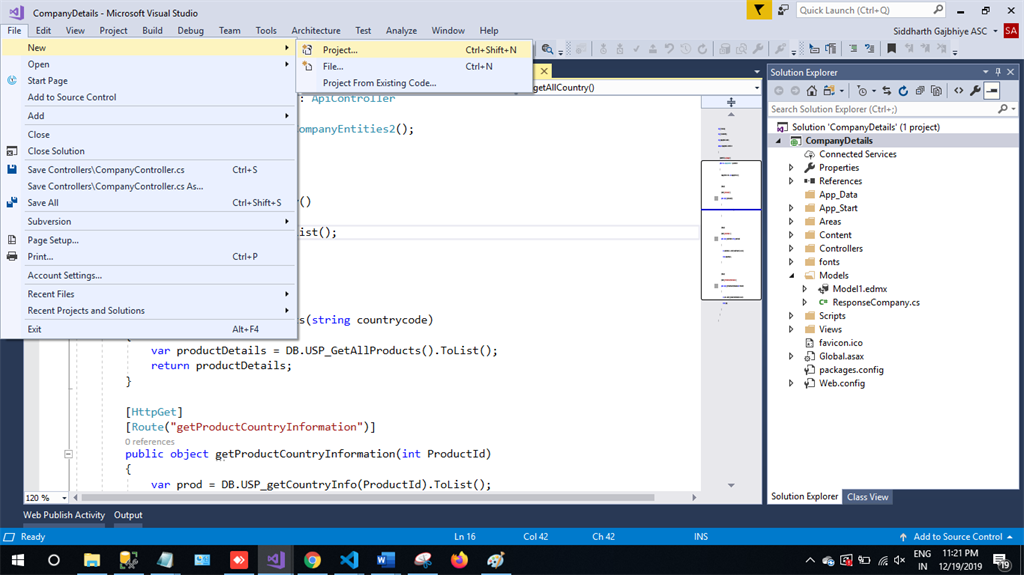
Step 1: In Visual Studio 2019, click on File -> New -> Project.
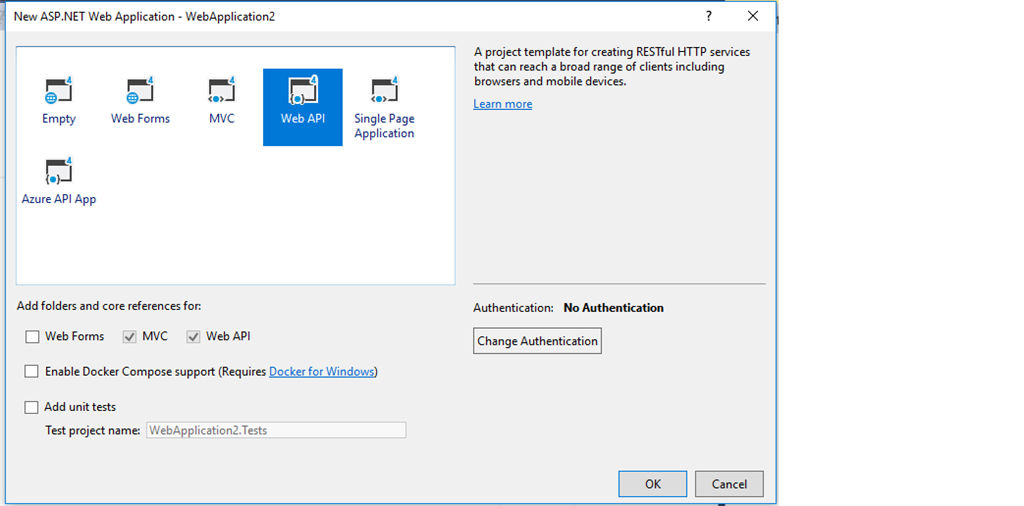
Step 2: Choose the Create option and select Asp.net web Application.
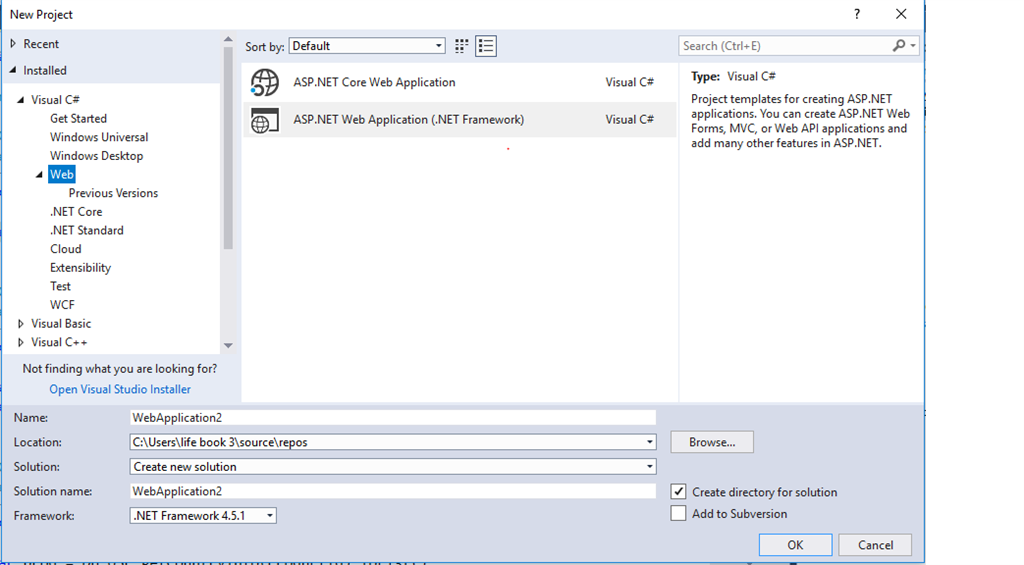
Step 3: Select WebApi and click on Ok.
Step 4: Now right click on controller and add and then new item.
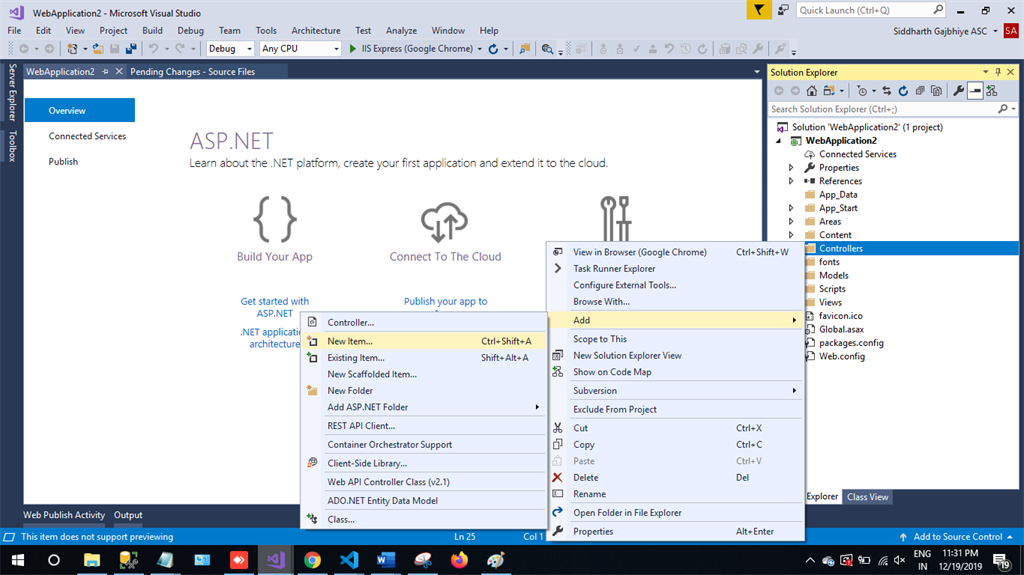
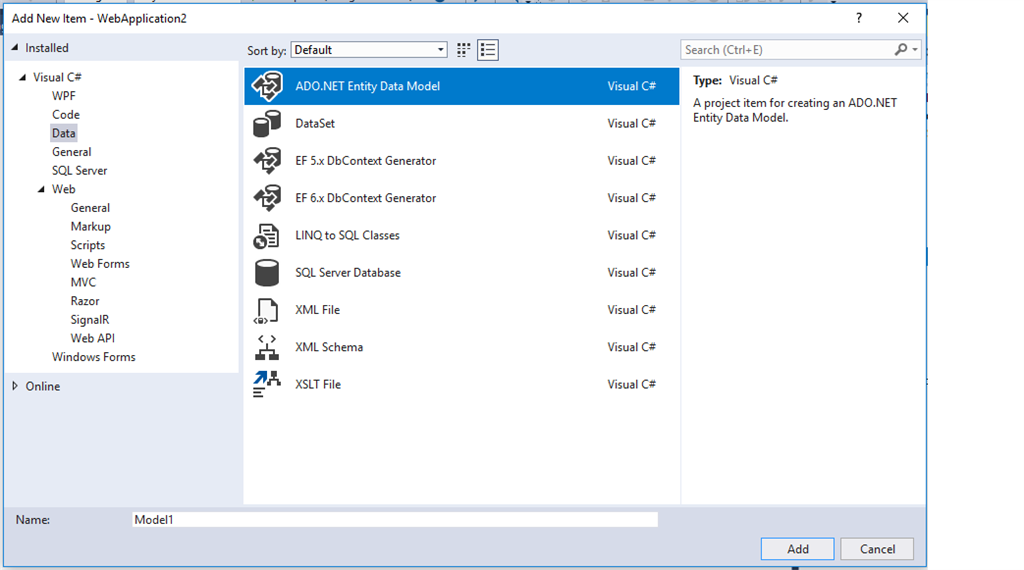
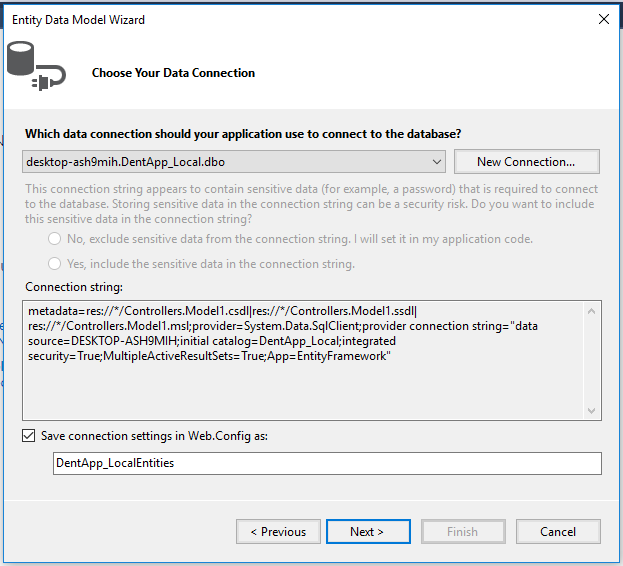
Step 5: Choose Ado.net Entity Data Model and then click on Add.
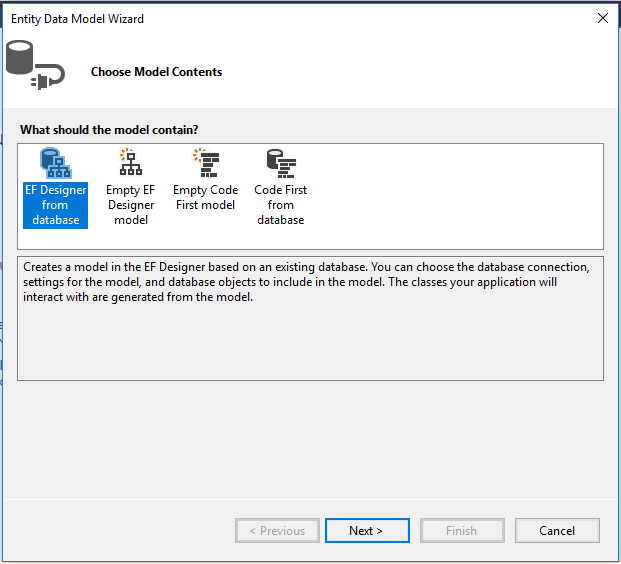
Step 6.Next Step is EF Designer just click on next .
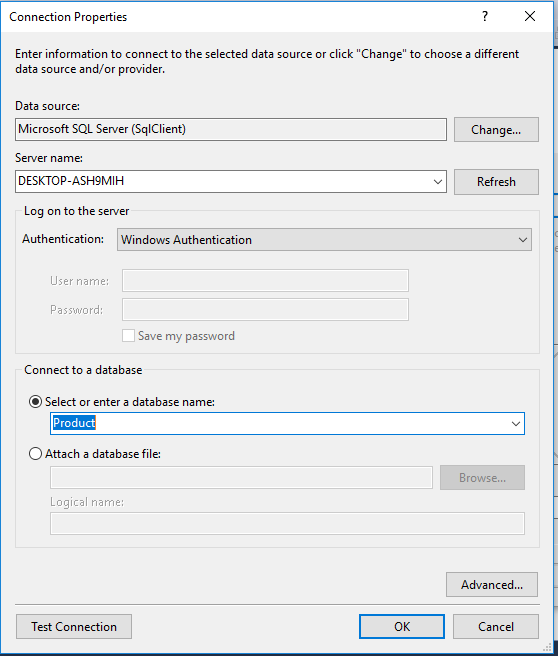
Step 7: New Pop up will come click on next if your is not established then click on new connection.
Step 8:Copy your database connection server name and paste it in server name text box after then you will see all the database select your database and click on OK.
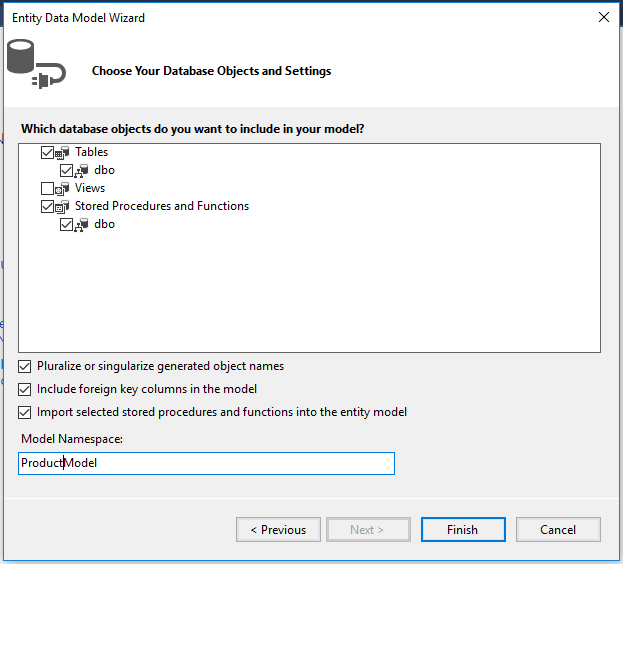
Step 9: Next pop up will come paste your database server name choose for the database and test for the connection then click on next here in new screen select your tables and store procedure and click on finish.
Our Next Step is to Right-click on the Controllers folder and add a new controller. Name it as "Product controller" and add the following namespace in the Student controller.
Here is the complete code to for getting all the products data and there nested product information data.
Complete Product controller code
- using System.Linq;
- using System.Web.Http;
- using CompanyDetails.Models;
- namespace CompanyDetails.Controllers
- {
- [RoutePrefix("api/Company")]
- public class CompanyController : ApiController
- {
- CompanyEntities2 DB = new CompanyEntities2();
- [HttpGet]
- [Route("getAllCountry")]
- public object getAllCountry()
- {
- return DB.Countries.ToList();
- }
- [HttpGet]
- [Route("getAllProducts")]
- public object getAllProducts(string countrycode)
- {
- var productDetails = DB.USP_GetAllProducts().ToList();
- return productDetails;
- }
- [HttpGet]
- [Route("getProductCountryInformation")]
- public object getProductCountryInformation(int ProductId)
- {
- var prod = DB.USP_getCountryInfo(ProductId).ToList();
- return prod;
- }
- }
- }
Now, its time to enable CORS. Go to Tools, open NuGet Package Manager, search for CORS, and install the "Microsoft.Asp.Net.WebApi.Cors" package.
If you are running your front end application in different port and your server is running in other port then to avoid Cross-Origin-Resource-Sharing issue you have to add small code in webapiconfig.cs file.
Open Webapiconfig.cs and add the following lines.
- EnableCorsAttribute cors = new EnableCorsAttribute("*", "*", "*");
- config.EnableCors(cors);
BACK END
Here Back-end related code we will do it using SQL server
The very first step is to create a database
Create database
Let’s create a database on your local SQL Server. I hope you have installed SQL Server 2017 in your machine (you can use SQL Server 2008, 2012, or 2016, as well).
Step 1 create database product
- create database product
Step 2 Create Product Table by using the following code
- USE [Product]
- GO
- /****** Object: Table [dbo].[Product] Script Date: 12/18/2019 10:23:19 PM ******/
- SET ANSI_NULLS ON
- GO
- SET QUOTED_IDENTIFIER ON
- GO
- CREATE TABLE [dbo].[Product](
- [ProductId] [int] IDENTITY(1,1) NOT NULL,
- [ProductCountryInformationId] [int] NULL,
- [ArtNo] [nvarchar](50) NULL,
- [Provider] [nvarchar](50) NULL,
- [ProviderArtNo] [nvarchar](50) NULL,
- [Brand] [nvarchar](50) NULL,
- CONSTRAINT [PK_Product] PRIMARY KEY CLUSTERED
- (
- [ProductId] ASC
- )WITH (PAD_INDEX = OFF, STATISTICS_NORECOMPUTE = OFF, IGNORE_DUP_KEY = OFF, ALLOW_ROW_LOCKS = ON, ALLOW_PAGE_LOCKS = ON) ON [PRIMARY]
- ) ON [PRIMARY]
- GO
- ALTER TABLE [dbo].[Product] WITH CHECK ADD CONSTRAINT [FK_Product_ProductCountryInformation] FOREIGN KEY([ProductCountryInformationId])
- REFERENCES [dbo].[ProductCountryInformation] ([ProductCountryInformationId])
- GO
- ALTER TABLE [dbo].[Product] CHECK CONSTRAINT [FK_Product_ProductCountryInformation]
- GO
Make product id as primary key
Step 3 Create Product Information Table by using the following code
- USE [Product]
- GO
- /****** Object: Table [dbo].[ProductCountryInformation] Script Date: 12/18/2019 10:24:02 PM ******/
- SET ANSI_NULLS ON
- GO
- SET QUOTED_IDENTIFIER ON
- GO
- CREATE TABLE [dbo].[ProductCountryInformation](
- [ProductCountryInformationId] [int] NOT NULL,
- [Price] [decimal](18, 2) NULL,
- [BuyAccount] [nvarchar](50) NULL,
- [SalesAccount] [nvarchar](50) NULL,
- [CountryName] [nvarchar](50) NULL,
- [ProductId] [int] NULL,
- CONSTRAINT [PK_ProductCountryInformation] PRIMARY KEY CLUSTERED
- (
- [ProductCountryInformationId] ASC
- )WITH (PAD_INDEX = OFF, STATISTICS_NORECOMPUTE = OFF, IGNORE_DUP_KEY = OFF, ALLOW_ROW_LOCKS = ON, ALLOW_PAGE_LOCKS = ON) ON [PRIMARY]
- ) ON [PRIMARY]
- GO
- ALTER TABLE [dbo].[ProductCountryInformation] WITH CHECK ADD CONSTRAINT [FK_ProductCountryInformation_Product] FOREIGN KEY([ProductId])
- REFERENCES [dbo].[Product] ([ProductId])
- GO
- ALTER TABLE [dbo].[ProductCountryInformation] CHECK CONSTRAINT [FK_ProductCountryInformation_Product]
- GO
- ALTER TABLE [dbo].[ProductCountryInformation] WITH CHECK ADD CONSTRAINT [FK_ProductCountryInformation_ProductCountryInformation] FOREIGN KEY([ProductCountryInformationId])
- REFERENCES [dbo].[ProductCountryInformation] ([ProductCountryInformationId])
- GO
- ALTER TABLE [dbo].[ProductCountryInformation] CHECK CONSTRAINT [FK_ProductCountryInformation_ProductCountryInformation]
- GO
Now its time to add some Store Procedures
Step 4: All you have to do is paste the following code in new query
- USE [Product]
- GO
- /****** Object: StoredProcedure [dbo].[USP_GetAllProducts] Script Date: 12/18/2019 10:24:35 PM ******/
- SET ANSI_NULLS ON
- GO
- SET QUOTED_IDENTIFIER ON
- GO
- ALTER Proc [dbo].[USP_GetAllProducts]
- As
- Begin
- Select p.*,pci.Price,pci.BuyAccount,pci.SalesAccount from [Product] p
- left join [ProductCountryInformation] pci
- on p.ProductCountryInformationId=pci.ProductCountryInformationId
- End
- USE [Product]
- GO
- /****** Object: StoredProcedure [dbo].[USP_getCountryInfo] Script Date: 12/18/2019 10:24:57 PM ******/
- SET ANSI_NULLS ON
- GO
- SET QUOTED_IDENTIFIER ON
- GO
- ALTER Proc [dbo].[USP_getCountryInfo]
- @ProductId int
- As
- Begin
- select pci.* from ProductCountryInformation pci
- left join Product p on pci.ProductId=p.ProductId
- where pci.ProductId=@ProductId
- End
With this step we have successfully completed our front end ,web API and back end coding.
Conclusion:In this article i have discussed how we create nested grid in Angular 8 Application and in my next article which is a continuation of this part we are going to learn about JavaScript function tolocalestring() by changing the price by changing the country and it give their appropriate currency format (Uploading very soon).


Comments
Post a Comment